Looking for a jaw dropping side dish to serve at your next party? Well, look no further!
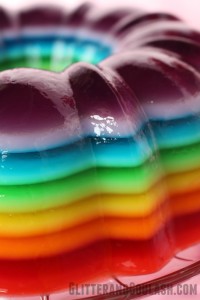
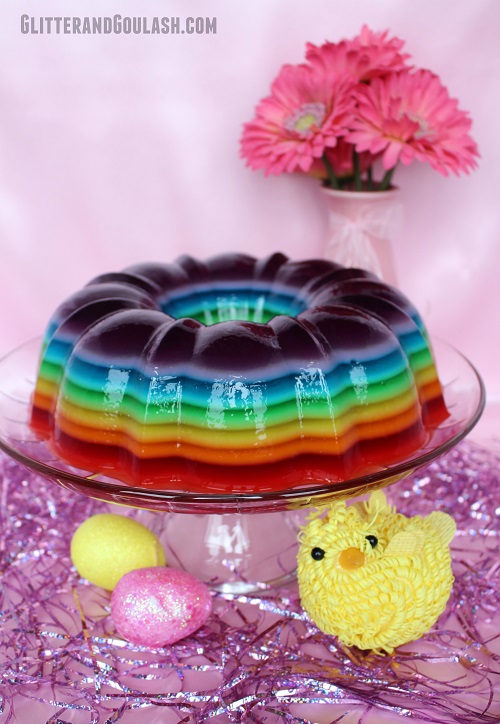
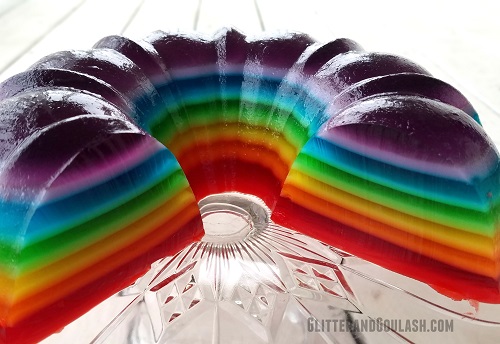
This beautiful Rainbow Jello mold is sure to catch the eye of everyone, not to mention it tastes delicious!
This is a very easy mold to make, but does require an approximate 3 hour time commitment from start to finish. You will not be in the kitchen the entire time, but will need to add layers every 10-15 minutes or so. So, pick a day when you will be doing stuff at home anyways and I promise it will be well worth the time!
This mold does need to set overnight so make sure you plan ahead. You can actually do this mold several days before you need it. Just make sure you keep the Jello in the mold, covered with cellophane until several hours before you will be serving it.
I also have a jiggler version of this recipe available. If you would like something a little less formal, one that does not need to be unmolded, but still beautiful and delicious, then check out my Rainbow Jello Jigglers recipe.
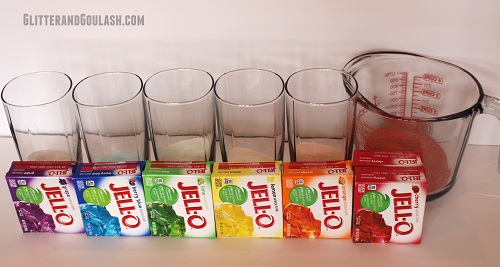
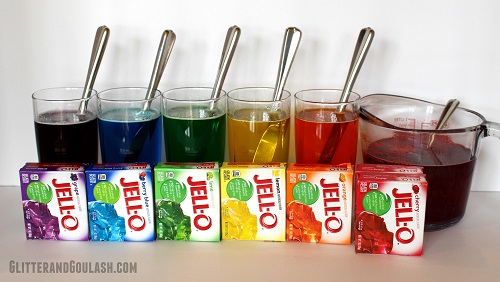
Next, stir 1 1/4 cups boiling water into each flavor (2 1/2 cups for the red). Stir each until gelatin is completely dissolved. You will want to position your glasses in opposite order of the rainbow as we will start with purple and end on red.
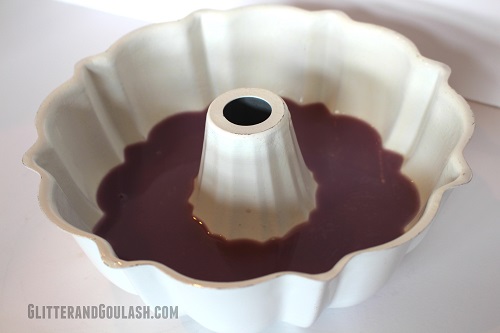
Spray your bundt pan with cooking spray, this will help the Jello mold release easily once it is set. Once you have done that we can start adding colors.
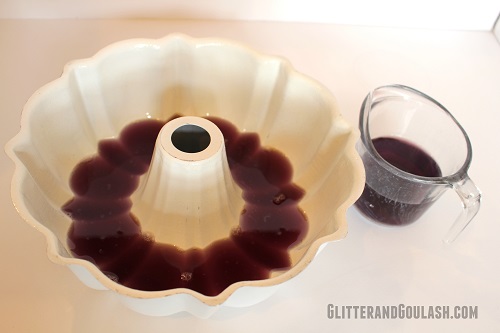
Add 3/4 cup of your purple gelatin into the bundt pan and then place in the refrigerator for 15 minutes. Make sure you set a timer for each layer as knowing when to add the next layer is very critical. You must chill each layer long enough to partially set, but not too long otherwise the next layer will not adhere. Don’t worry though, I will explain below what to look for so that you know exactly when it is time to add the next layer.
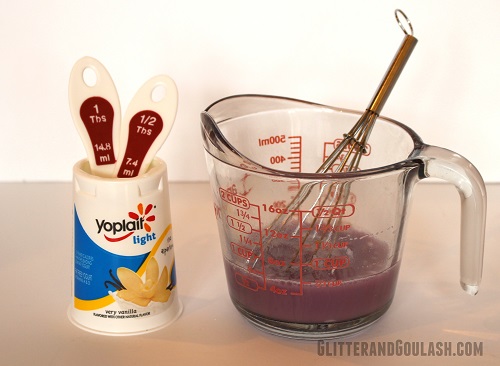
While the purple clear layer is chilling, take the remaining purple gelatin (should be 3/4 c) and add 1 1/2 Tablespoons of the yogurt and whisk until completely dissolved. Make sure there are no yogurt lumps left. Place this mixture into the refrigerator to chill until your first 15 minutes is up.
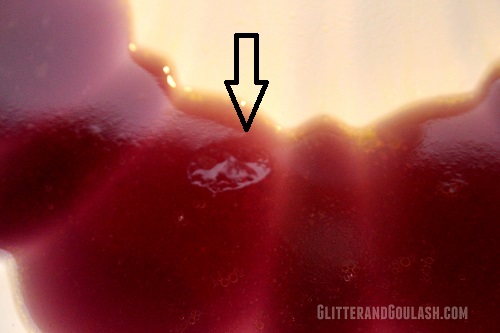
Once your timer goes off, take your bundt pan and yogurt mixture out of the refrigerator. You will first want to test the gelatin in the pan to make sure it is set enough to take the next layer. You will test this by lightly touching the jello with a finger tip and lifting up right away.
The jello should stick to your finger (not liquid) and leave a slight impression in the jello. If you have that, then you are ready to add your next layer.
This is hard to show in a picture, but if you look where the arrow is pointing, you will see the finger imprint. This is what you want to see.
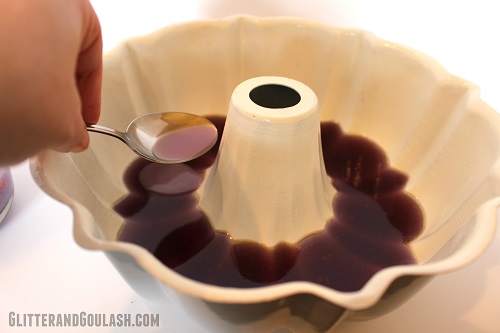
Now you want to add your yogurt mixture. With a spoon very GENTLY and SLOWLY add your yogurt mixture to the set jello layer. Make sure your spoon is nice and low when you are adding the yogurt mixture. This will ensure you don’t break through the bottom layer when you pour it in.
I try to dump my spoon towards the middle part of the bundt pan and let it dribble down the wall of the middle section. That way if you should break through the bottom layer, you won’t really be able to see it since it will be in the middle of the mold.
Continue until all of the yogurt mixture is added. Place back into the refrigerator for another 15 minutes.
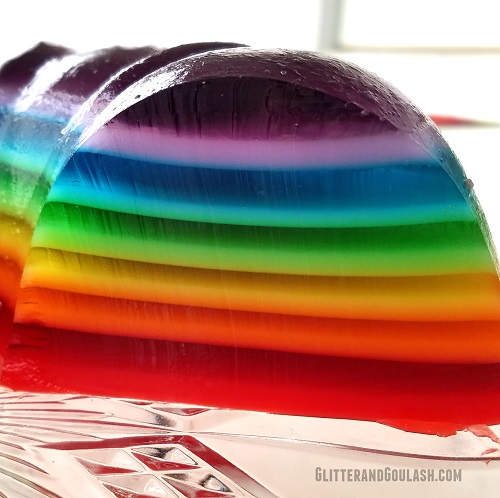
Complete this same process with the rest of your colors. Red will be your last layer, which will be a double layer. Use 1 1/2 cups of the liquid jello for the clear layer and 1 cup mixed with 5 Tablespoons yogurt for the creamy layer.
The other jello colors can remain on the counter during this entire process.
I have never had any of the waiting jello start to set. If this should happen though, simply fill a bowl with hot water and place your jello container inside of the water bowl and stir until the set jello loosens up and turns back into liquid.
Your cooling time will lessen with each layer added as the cooler the jello gets, the less time it takes to set. Also, each layer gets thinner and thinner so the jello will chill quicker. So each layer might not take the entire 15 minutes. When I get to the green layer I start checking around 10-12 minutes and adjust accordingly.
Once you have added all 12 layers, let the filled mold set overnight.
When you are ready to release the mold, simply fill your sink with warm (not hot) water. The water should cover the majority of the bundt pan, but should NOT come all the way to the top. You do not want any water to get into the jello mold.
Let your mold sit in the warm water for about 10-15 seconds. You will see the side of the jello get a little shiny and liquefy slightly. That is a good sign that the jello has separated from the mold.
Once you see that, take your mold out of the water and dry off the pan. Take the plate that you will be serving the jello on (should be flat and at least 2-3 inches wider than your mold) and sprinkle a couple drops of water around where the jello will be touching the plate. This will allow the jello to adjust and spread a little once it is released.
Now place the lightly moistened plate over the jello mold. With a good grip on the mold and plate, flip the plate and mold over. Slowly lift your mold and the jello should release easily. If any water has accumulated on the plate around the jello, simply take a paper towel and wipe until clean and dry.
Now take a step back, and pat yourself on the back for the beautiful creation you made.
Looking for St. Patrick’s Day desserts? Check out all of my recipes here.
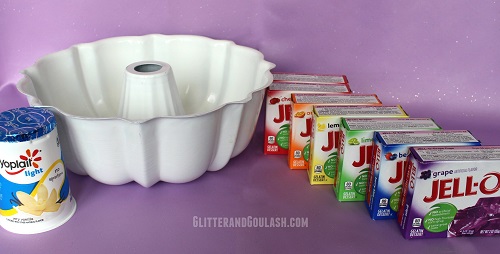
- 7 3 oz. packages of gelatin
- 1 purple
- 1 blue
- 1 green
- 1 yellow
- 1 orange
- 2 red
- 1½ cups vanilla yogurt
- 8¾ cup boiling water
- First, dump your gelatin powder into 6 individual containers. The containers need to be able to hold at least 1¼ cups of hot liquid. You will need a bigger bowl (one quart) for the cherry one as you will be using two boxes of that flavor.
- Next, stir 1¼ cups boiling water into each flavor (2½ cups for the red). Stir each until gelatin is completely dissolved. You will want to position your glasses in opposite order of the rainbow as we will start with purple and end on red.
- Spray your bundt pan with cooking spray, this will help the Jello mold release easily once it is set.
- Add ¾ cup of your purple gelatin into the bundt pan and then place in the refrigerator for 15 minutes. Make sure you set a timer for each layer as knowing when to add the next layer is very critical. You must chill each layer long enough to partially set, but not too long otherwise the next layer will not adhere.
- Take the remaining purple gelatin and add 1½ Tablespoons of the yogurt and stir until completely dissolved. Make sure there are no yogurt lumps left. Place this mixture into the refrigerator to chill until your first 15 minutes is up.
- Once your timer goes off, take your bundt pan and yogurt mixture out of the refrigerator. You will first want to test the gelatin in the pan to make sure it is set enough to take the next layer. You will test this by lightly touching the jello with a finger tip and lifting up right away.
- The jello should stick to your finger (not liquid) and leave a slight impression in the jello. If you have that, then you are ready to add your next layer.
- Now you want to add your yogurt mixture. With a spoon very GENTLY and SLOWLY add your yogurt mixture to the set jello layer. Make sure your spoon is nice and low when you are adding the yogurt mixture. This will ensure you don't break through the bottom layer when you pour it in. Place back into the refrigerator for another 15 minutes.
- Complete this same process with the rest of your colors. Red will be your last layer, which will be a double layer. Use 1½ cups of the liquid jello for the clear layer and 1 cup mixed with 5 Tablespoons yogurt for the creamy layer.
- The other jello colors can remain on the counter during this entire process.
- I have never had any of the waiting jello start to set. If this should happen though, simply fill a bowl with hot water and place your jello container inside of the water bowl and stir until the set jello loosens up and turns back into liquid.
- Your cooling time will lessen with each layer added as the cooler the jello gets, the less time it takes to set. Also, each layer gets thinner and thinner so will chill quicker. So each layer might not take the entire 15 minutes. When I get to the green layer I start checking around 10-12 minutes and adjust accordingly.
- Once you have added all 12 layers, let the filled mold set overnight.
- When you are ready to release the mold, simply fill your sink with warm (not hot) water. The water should cover the majority of the bundt pan, but should not come all the way to the top. You do not want any water to get into the jello mold.
- Let your mold sit in the warm water for about 10-15 seconds. You will see the side of the jello get a little shiny and liquefy slightly. That is a good sign that the jello has separated from the mold.
- Once you see that, take your mold out of the water and dry off the pan. Take the plate that you will be serving the jello on (should be flat and at least 2-3 inches wider than your mold) and sprinkle a couple drops of water around where the jello will be touching the plate. This will allow the jello to adjust and spread a little once it is released. Now place the lightly moistened plate over the jello mold. With a good grip on the mold and plate, flip the plate and mold over. Slowly lift your mold and the jello should release easily. If any water has accumulated on the plate around the jello, simply take a paper towel and wipe until clean and dry.
- Keep refrigerated.




I’ve been making this for 35+ years, and it is a showstopper & a crowd pleaser. I let each layer chill for 30 minutes, during which time I whisk ⅓ cup sour cream into the other half of each clear layer’s color, then pour the next layer over the back of a large serving spoon, so it doesn’t disturb the first layer. They adhere just fine this way, & there’s no guesswork involved. It takes 6 hours to do it this way, but really, it’s only a few minutes per each layer.
Thank you for your feedback Laura! I agree, it is ALWAYS a showstopper. It is really a work of art on a buffet table, not to mention it is also very delicious!
I’ve been making for 31 years with sour cream and yes, always a show stopper. It is a tradition for Easter dinner. My mom made it and now have had it for the last 50 years for Easter.
I LOVE to hear this! It is funny how old family recipes seem to “make” a holiday.
Hi! in your list of ingredients it says 3 ounce packages but do you mean 0.3 ounce? Maybe it’s obvious but I just want to make sure I’ve got it right. I am no cook!
Hi Megan, thanks for your question. Jello brand gelatin sells two different size boxes, the 3 ounce box and a 6 ounce box. The smaller box (3 ounce) is the one you want to use for the mold. Good luck and let me know if you have any more questions while making it!
Hi there, I have purchased Knox Gelatine. Will this work?
No, unfortunately you will need to purchase the flavored Jello. The Knox is gelatin which will thicken everything for you, but it does not have any flavor added to it.
I want to make this for my little girl’s birthday today. After I finish with all the layers, can I put it in the freezer since I won’t have time to let it sit overnight?
Hello,
I would not recommend freezing it! It will probably crystallize and turn watery once you thaw it? I would recommend making this when you have ample time to allow it to set in the refrigerator.
Please let me know how it turns out once you have made it. Good luck!
The recipe was easy to follow thank you. 15 minutes was enough for me on each layer.It Was a hit now I would love to find different mold s.
I am so glad that it turned out for you, thank you for your feedback! You can check any local cake and candy stores for new molds. Otherwise, you can always find them online, Amazon has a good size selection.
Is there anything else that can be used instead of yoghurt as I need to make it dairy free??
Thank you.
Hi Rubina! I have never made the rainbow jello with anything other than regular yogurt, but I would think that soy yogurt (which is dairy free) would work in the same way as regular yogurt? I am not sure if you live in an area where soy yogurt is available or not, but I have also heard that it is pretty easy to make at home if you cannot find it in stores around you. Please let me know if you try it and how it turns out, I would love to share it with our other dairy free readers.
Hi, so just to clarify you mix the yoghurt in the specific coloured jelly for the last bit to mix ontop before you add the next colour? I got confused in last section of method with mixing yoghurt on clear jelly mix? Can you please explain? Thanks. Looks great!
Hi Jessie! You will first place the purple plain jello (without yogurt) in your pan. After the 10-15 minutes have passed to let that layer set, then you add your remaining purple jello and yogurt together to make the next layer. Once that sets then you will add the plain blue jello. Once that sets, then you add the blue jello and yogurt mixture. You will continue to do this until you have done all of the colors. Basically, there should be one plain jello layer and one jello/yogurt layer for each color. I hope this helps, please let me know how it turns out.
Perfect explanation!! Thank you!
This might be a silly question but do you let the jello cool before starting or do you use the mixtures hot straight after you have made them?
Hi Gillian, this is not a silly quesion at all. No, you do not need to let the jello cool before adding it to the mold. That is why the first couple layers stay in the refrigerator a few minutes longer to let the jello cool longer. The actual amount that you put in each layer is not that much so it cools quite quickly once you put it in the refrigerator. Each subsequent layer will take less time.
Ok, so I’m wondering…. I had a successful night with making the layers but as of this morning. I went to put the pan in “hot” oops water an got about 2tbsp of water on top of mold. I started to see colors of the blue an purple come to the top. I panicked an placed mold back in the refrigerator!
-What NOW???
-Think it’s going to be completely mixed?
Ugh…..
That is awesome that you put it back in the mold, good move!! I think what happened is your water was too hot and/or it was left in the water a little too long so it started to melt the jello a little. I have had this happen and it will still come out fine. I am sure that it was just the very outside layer that melted a little, your inside layers should be fine. Try the unmolding part again, this time though, make sure your water is warm, just not steaming hot. If you start to see liquid at the top of your mold, remove from the water right away and dab the liquid with a paper towel to remove. Once you have done that, try to invert the jello onto your plate. It should still come out fine. Remember that you want a little moisture on your plate before you mold it as the this will help the jello to expand easily once it is on the plate. Good luck, PLEASE let me know how it turned out!
Can you use sugar free jello? I am diabetic (and secretly make desserts for family the sugar free way!) The less carbs the better.
Hi Katherine! I have never used sugar free jello for the mold before, but I would imagine that it would be just fine. I looked on a few different websites and they all said that sugar free Jello works perfectly and in the same manner as regular Jello. So I would say go for it, and please let me know how it turns out. That would be good information to add to the post for other diabetic readers.
Did it work then with sugar free jello?
Hi Katherine! I have never made the sugar free version, but I don’t see any reason why it wouldn’t work. There are quite a few recipes online for sugar free Jello molds so I think you are safe to give it a try. Please let me know how it turned out!
What if the jello is not getting hard its been 20 minutes
It doesn’t need to get hard, it just needs to get tacky enough to lightly stick to you fingertip.
This is so neat looking! the thought of mixing just any and so many flavors together scares me! Is it really delicious regardless of the flavor combo?
Don’t let the looks intimidate you. It really is easy to make, just a little time consuming. The end product is SO gorgeous, it it totally worth trying.
Hello! I was wondering if this can be made to be like finger jello? (Can I use bigger boxes and follow your instructions to make it thicker like finger jello?) my kids want this, but want to eat a slice with their fingers. 🙂
Hi Colleen! That is an awesome idea to turn this mold into jigglers! What kid (and adult) wouldn’t love to snack on that? Honestly, the amount of water used in this recipe is the same as the “Jello jiggler” recipe which basically is just using about half the amount of water that you would typically use if you were making a regular batch of jello (1 1/4 cup instead of 2 cups) so it is pretty sturdy once you unmold it. I would think that if you followed the recipe and just put it in a well sprayed 9 x 13 glass dish, it would work the same and then you could easily cut into squares and munch away. You have peeked my curiosity, so I think I might need to try this as well. My kids would want it for dessert in their lunch everyday. Let me know how yours turns out and I will try to get it done in the next week or two and let you know. Good luck!
How far in advance to an event can I make this?
I typically make this jello mold 3 days in advance and it always turns out great. I would think that as long as there is no fruit in the mold, it would be good even 5 days or so in advance? I would just make sure that you leave it in the mold until several hours before you plan on serving it. Good luck!
I forgot to spray the pan and I can’t get it out ! What do I do ???
I think that you should still be fine as long as you remember to do the warm water soak before you try to unmold it. Typically you only want to use warm water and leave in for about 10-15 seconds. Since there is no spray though, maybe make the water a little warmer than what I would typically recommend and leave in for a few more seconds. The warm water acts as a release agent as it basically melts the jello away from the mold. You will probably see some colored liquid (the melted jello) once it releases, but that can easily be cleaned by dabbing the liquid with a dry paper towel and will be a better option than the mold breaking. Please let me know how it turns out.
Hello!
I would like to make this for my daughter’s birthday party, but am afraid I won’t have a full 3 hours of uninterrupted time in which I could make it. Is this the kind of thing that I could stop in the middle, allow to refrigerate for 24 hours, and resume the layering the next night? Or is this a no-no?
Thank you 🙂
Hi Sarah, unfortunately this is a project that you really need to do in one 3 hour session. I have never tried stopping and starting again the next day, but what I am pretty sure will happen is the layer that you start out with the next day will not adhere properly to the one that you left off with. The layers really need that slightly tacky feel, it almost acts like the glue.
The actual time during the three hours is very minimal, however. You just need approximately 1-2 minutes every 15 minutes to add the next layer. You can be doing other things around the house while you are waiting for your timer to go off. I always do it on my laundry day:-)
Good luck, wish your daughter a Happy Birthday for me. I made this for my daughters third birthday party. It was a Care Bears theme party and the rainbow jello fit in perfectly!! The kids couldn’t get enough of it. I also just posted this same jello recipe, but in jiggler form. That might be another great option if you have concerns about the mold.
Great post! I have made this Jello in the past, but with no clear layers. It was all pastel! It was a Care Bears themed party, so it was perfect. It’s also perfect for Easter. I use Carnation milk instead of water. Thanks.
It is always great to hear other variations to this recipe. It is so fun and festive!
Made this for my sons 2nd birthday but, i only did clear layers and no yogert layers.started with
Berry blue
Raspberry
Lemon
Cherry
Green apple (jolly rancher)
Watermelon (jolly rancher)
Then the same order all over again ending with berry blue since i had two boxes of that flavor. I hope you can see the layers when i get it out of the pan…
Awesome, I would love to see a picture if you have a chance to send. I would love to see what it looks like without the yogurt layer.
OK so I tried to mix the yogurt and jello together in my bullet…. big mistake!!! instructions need to say be sure to use a wisk . Maybe next time will be prettier this one not so pretty…
Hi Angelia! I have changed the word “stir” to “whisk”. What happened to the mixture in the bullet that you couldn’t use it? Did it get to frothy?
Yeah! It worked! It took me four hours and I was up till 1 am, but it was beautiful! (How can I send you a picture?)
Yeah, nice work!!! You can send me a picture at glitterandgoulash@gmail.com. I cannot wait to see it.
Hi, the packets of Jelly I am using are 3oz but state that you need to mix with 2 cups of water. Should i still use your ratio of 1 1/4 cups of water per packet? Thanks
Yes, only use the 1 1/4 amount of water per 3oz. box of Jello. The 2 cup amount that you see on the box is for a regular bowl of Jello. We are making the “jiggler” version of Jello. Less water will give you a more firm Jello that will be able to maintain its shape once you unmold it. Good luck!
Thanks so much for your quick reply Julie! was going to make this late last night (am in New Zealand) for my sons bday on sundaybut didn’t want to risk doing the wrong thing so decided to wait until this morning. Got up early and so pleased to see your advice. Starting now 🙂
Have you ever tried this with cool whip instead of yogurt or sour cream like another reader? just wondering if it would work in same fashion.
I am not sure about Cool Whip, but I know that sour cream does work as a substitute for the yogurt.
My daughter is dairy-free, so I used 2 T of coconut milk in each creamy layer instead of yogurt. It looks exactly the same and set up perfectly! Obviously, it has a faint coconut flavor, but it isn’t overpowering. Plus, we tend to like coconut anyway. The Jello flavors are so strong that you can hardly tell. Perfect “cake” for our Slime Birthday Party!
Thank you so much for your feedback. I have a lot of people that wonder about a dairy free substitute, now I can tell them with certainty that it can be made dairy free and that you had success with the coconut milk. Thank you so much and I am glad that it turned out for you. It is always such a sense of accomplishment when you unmold this and take a step back to look at its beauty.
I am for sure going to make this have a few questions
To travel with this would you plate it then keep in fridge ? till time to leave home
how long can it stay on table ?
my concern is will it be to soft after an hour out
Hi Paulette! It is best to leave it in the mold if you are going to travel with it. When I travel with mine, I will flip the mold onto the plate (follow directions for doing this) that I will be displaying it on (do not lift the mold off of the jello yet though), then travel like that. Once I get to my destination I will then Lift the mold off of the jello. I would not recommend traveling with it unmolded. There is too much time put into this beautiful creation to let a pothole ruin it. Also, it can stay on the table for hours as long as it isn’t horribly hot in the room. As long as the room is an average temperature, it should be fine. The cooler the better. Good luck, let me know if you have any more questions.
Hi! I’m making this right now and the first Purple layer has been in the fridge now for 30 mins and is not setting?!
Is it solidifying at all?
This has to be the most well explained instructions I’ve ever read. To the point and yet didn’t leave out any details!!!! She/he should write instructions for EVERYTHING!!!!
This turned out so good!! We had a rainbow birthday party and it was a big hit!! So much fun!
That is awesome, so glad it turned out for you! Love to hear the results of those that try this. It is such an easy thing to make, just a little time consuming.
Great post! Have nice day ! 🙂
Thank you very much for this great recipe. My little daugther love her birthday “jelly cake”. 🙂
https://selbstdiefrau.wordpress.com/2017/10/02/rainbow-jello-wackelpuddingkuchen-regenbogentorte-perfekt-fuer-kindergeburtstage/
You are welcome, thanks for the feedback! I am glad that your daughter loved her “jelly cake”. There is nothing like a rainbow to make a party brighter:-)
Could you use coconut yoghurt?? For dairy free??
I am not sure about coconut yogurt, but I know that I have had a reader use coconut milk and she said that it turned out wonderfully. It did have a little coconut flavor hint to it, but was really hard to notice if you didn’t know it was used.
So.. I was wondering if this would work as a massive version of a Jell-O shot for an adult St. Patricks themed party with Vodka instead of water? Any experience with this?
I am sure that it would work, but have never personally tried it. It is an awesome idea though, please let me know if you tried it and how it turned out.
So I was not confident when I started making this but I took the leap of faith with your excellent instructions in hand. In Canada, the required Jello boxes are 85 g in size. I used 1.5-2 tbsp of Cool Whip in place of vanilla yogurt for each creamy layer. I needed to leave the first layer close to 30 minutes to set, but then each layer took progressively less time. Not surprisingly, the layers to which I added chilled Cool Whip took a bit less time to set. The last 2 layers (red) required a bit more time to set because they were thicker. It took 3.5 hours in total to prepare. I held my breath when I removed the bundt pan the next day but it turns out just as promised. The final result was a very happy group of nine-year-old girls. Many thanks, Julie!
Thank you so much for sharing your experience with this recipe! I am SO happy that it turned out for you and I would have loved to see the smiles on all of the kiddos at the party.
I made this for my daughters Birthday, it turned out great. Followed the recipe using vanilla yogurt. Everyone at the party was amazed at how beautiful it looked. This is definitely a keeper. Will make it again.
Awesome!!! I am so glad to hear that you tried it! I am glad that your daughter had a wonderful birthday!
Hi,
I’m from Australia and I would love to make this rainbow jello but we don’t have the same products as you. How much gelatin is 7 3oz in grams? Also is it ok to use Jelly as we don’t have Jello, is it the same?
Hello! Jelly is not the same as Jello, please do not make the recipe with that as it will not turn out. I believe each ounce equals approximately 30 grams in weight. Since you do not have Jello available where you are, you can always order it online. If you go to the bottom of my post, there is a link to order them through Amazon. I hope that helps, Good luck!
Hello Julie, do you have an approximation for how many servings this would make? I don’t remember seeing it included with the recipe….did I miss it?
If you are making the 9×13 it will give you about 32 pieces if you cut your rows 4×8. If you are doing the formed mold version it feeds A LOT! Again, depending on how big you cut your pieces you can get at least 32 pieces out of it. I hope this helps!
Hello! So I made this for a school project and I want to check if it came out the way it was supposed to before I take it to school in case I have to make another one. I don’t want the mold to fall apart or anything to happen if I pull it apart. I don’t know what to do! HELP!!
Hello Jessica! You can go ahead and unmold the Jello, I have done this before with great results. Once you have inspected it and it is ok, you can easily and carefully slide the mold back on top of it to keep it supported for traveling. It should not harm it as long as you move slowly. Maybe have a second person with eyes on the half that you cannot see while you are unmolding it. Good luck and please let me know how it works out!
I made this for Thanksgiving and am currently making it for Christmas. Thank you so much for the detailed directions! I could hardly contain my excitement when I flipped the mold and it turned out perfectly! Thank you!!!
So glad to hear you enjoyed it. It is definitely a “jaw dropper”! Merry Christmas!
I made this and it took forever but the results were totally worth it. Such a showstopper! The kids were even impressed! I’ll make again for a special occasion!
Can you use vodka in place of water
I believe so, but have never tried it before. Most jello shot recipes are simply replacing the water with vodka, but I don’t know that I would recommend it with this recipe as it does take quite awhile (about 3 hours) to make. So, if it doesn’t set, then you have wasted quite a bit of time.
Hi, i’ve just attempted this for my daughter’s birthday that happens to fall on Easter Sunday this year. I finished it late on friday night, shall i keep it in the pan until sunday morning or should i turn it out on saturday and cling wrap it? Thank you so much such a beautiful dish!
I apologize for not seeing this prior to Easter. I would have advised to Keep it in the mold until you are ready to display it. How did it turn out?
Will this work in a silicon mold?
I do not recommend using a silicone mold with a jello mold.
A. M. A. Z. I. N. G!!! I followed recipe to a “t”. Excellent direction. Turned out perfect. Hopefully you still get feedback and see this. Wondering if a baster would work for laying out liquid layers. Thank you for posting this recipe.
I am sooo glad it worked out for you. I LOVE hearing feedback of the recipes that I post. As far as the baster, I would not recommend using it. I think that there might be too much force when you squirt the jello out and it might tear the layer below it. I would personally just stick with the spoon!
I paint for for a living, and I paint from life, whenever possible. Do you think if I made this , it would hold up for several hours, after I took it out of the mold? Will it melt after a while? how long??? Just curious. I might have to paint this from photo if ilife doesn’t work.
Let me know if you have any advice(?) please. Thanks for the recipe here!
Hi Mike, It will hold up for a few hours as long as it is a cool room. When it gets warm is when it will start to melt and disintegrate a little. I would love to see it when you are done, what a cool idea!
Hi! I’m not sure if this is of any interest to you but my husband made this for our daughter’s birthday and it turned out AMAZINGLY and then I created a TikTok about the experience and it went a bit viral! Here’s a link.
https://vm.tiktok.com/ZMJSLWx3x/
Lots of people asked for the recipe and I kept linking it in the comments until I finally got smart and did a video reply linking back to you, for all to see 🙂 Beautiful recipe! THANK YOU!
Jessie, that is AWESOME!!!!! Your daughter is adorable!!! Thank you for linking it back to the website, I greatly apprectiate it! I will try to share your TikTok and send some traffice your way! Thanks again!!
Thank you Julie for this Recipe! First attempt for me and was just beautiful. It tastes amazing but just a Showstopper!!!
Awesome!!! I love hearing this, thanks for sharing!!!