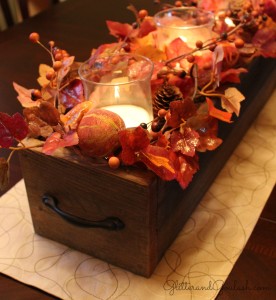
Autumn is one of my favorite times of year. I love making my home come alive with fall colors, flavors, and scents. These barn wood boxes are made out of reclaimed barn wood and are perfect to use as centerpieces for your autumn entertaining and all year round.
These barn wood boxes are so versatile that they will work for any holiday or special occasion that you can think of. For Christmas, I will replace the fall foliage with pine branches or spruce tips and holly berries (see here). For Easter, I will plant rye grass in them and place easter eggs or three crosses in the grass. For everyday, I will simply leave the candles in and add some decorative branches and pine cones.
Finding authentic barn wood might be the biggest challenge in making these boxes. I have seen barn wood advertised online (Craigslist), it can also be found at farmers markets and tag sales. Or, if you just happen to drive by an abandoned barn you could always stop in and ask if they would be interested in selling any of the wood. You don’t know until you ask, right?
If you are not able to find authentic barn wood, or just don’t want to go the hassle of finding it, there are stores that sell faux barn wood. Any local Home Depot, Lowe’s, or Menards should carry a product that replicates rustic barn wood. This will be just as beautiful when you are finished as the real thing.
I have two different tables in my home so I will give you the dimensions for both tables. There is no rule or standard size for these boxes, I simply tried to eyeball the length so that it it fit to scale with the rest of the table size. Please adjust accordingly how big or small you would like these.
Formal Dining Room Table (seats 6-8 and is 6.5 feet long)
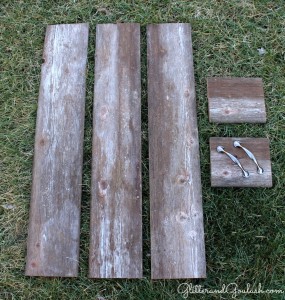
Bottom and sides (3 pieces)- 29 inches long, 5 3/8 inches high
Ends (2 pieces)- 6 3/4 inches long, 5 3/8 inches high
Kitchen Table (seats 4-6 and is 5 feet long)
Bottom and sides (3 pieces)- 20 inches long, 5 3/8 inches high
Ends (2 pieces) – 7 inches long, 5 3/8 inches high
The first step in making these boxes is to attach the bottom piece of the box to a side piece. I used one nail in each far end to hold the two pieces together. Make sure that your nail is small otherwise, there is a risk of splitting the wood. If you are concerned about splitting the wood, you can always drill a very small pilot hole in the wood first.
Make sure that the side panel is flush with the bottom before the nail is sunk into place. If your side panel extends beyond the bottom panel, then it will be wobbly when it is finished.
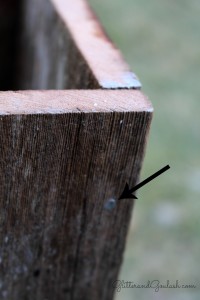
Next, attach the opposite side panel to the bottom. Again, making sure that the side panel is flush with the bottom one.
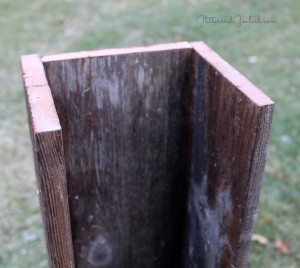
Handles are optional for these boxes, it is all about personal preference. I personally like having them on the box, it makes the boxes much easier to move around and I think that the end product is much more elegant with the handles.
If you do choose to put handles on your box, you will want to do that before you attach the end pieces to the sides. I would have liked to put a pair of vintage handles on my barn wood box, but I wasn’t able to find any that I really liked. I did find these oil rubbed bronze handles at my local Menards and decided to use them. They matched my light fixtures and they seemed to blend in well with the rustic wood.
Once your handles are attached, then you can attach each end piece placing a nail in each corner (4 total nails).
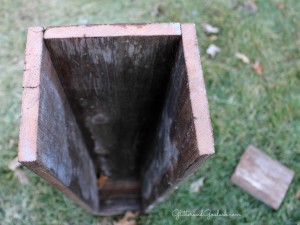
Now, the box itself is finished, but before you start decorating, you will want to place a piece of styrofoam, floral foam, or floral oasis inside of the box. This will help to raise the height of the decorative material that you are going to use to the top of the box so that it can be seen.
Since the styrofoam is not very pretty to look at, I covered it with some old burlap that we had and tucked it around the sides and corners to hide all of the white styrofoam.
So, now the box is all prepped, what will you put inside? Regardless of the season or occassion that I am decorating for, I always like to start with some soft light. For me, that is typically votives with candles in them. Or if I will have small children around, I will go with an electric tea light candle as those are much safer when you have curious hands around. Votives with candles are always a cheap, but beautiful addition to any centerpiece.
Next, it is always important to add some texture. Some common textures that I use are branches, berries and pine cones. We live in the country so I always have those items readily available. For this autumn centerpiece I also added some gourds and dried pumpkins to the foliage as well.
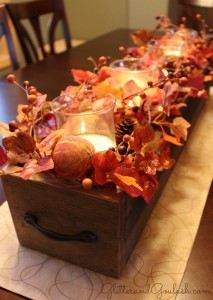
Please also remember that you can use these boxes for more than just centerpieces. I have seen small square ones used to hold remote controls on a living room end table or placed on book shelves filled with pine cones. My personal favorite, and one of my next projects will be to place antique Ball jars inside of the box with fresh herbs planted in them for an indoor herb garden. I cannot wait to get started on that one.








Leave a Reply