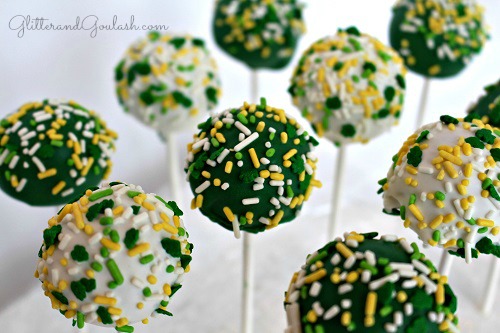
 Cake pops are a fun treat any day of the week, but are even more fun on holidays. St. Patrick’s Day is coming up so it is time to whip up a batch of Leprechaun Pops. These Leprechaun Pops are made from a Green Velvet Cake Recipe that you will find below. Any white boxed cake mix can be substituted, but I went with this homemade mix so that I could get the intense green color for St. Patrick’s Day.
This recipe yields quite a few cake pops, approximately 50. Which is great if you are giving them as gifts or need a large quantity for a bake sale. Typically, that is too many for my family though, so what I like to do is use an 8×8 pan (instead of a 9×13) filled two thirds full, and use the rest of the batter to make cupcakes.
The remaining batter will yield approximately 12 Green Velvet Cupcakes. I will then freeze the cupcakes (unfrosted) and use them at a later date.
The ingredients for this cake recipe are: flour, sugar, cocoa, salt, baking soda, eggs, oil, buttermilk, vinegar, vanilla, and green food coloring.
You will also need a container of Cream Cheese frosting, candy melts, sprinkles,and lollipop sticks
First, preheat your oven to 350 degrees and grease your pan.
Then, mix all dry ingredients together (flour, sugar, cocoa, salt, and baking soda)
Now, mix all of your wet ingredients together (lightly beaten eggs, oil, buttermilk, vinegar, vanilla, and food coloring)
Next, pour your wet ingredients into the dry ingredients and mix on medium-high for 1-2 minutes until well combined.
Once mixed, bake for 20-25 minutes if using the 8×8 pan. If using the 9×13 pan, then bake approximately 30-35 minutes. Since all ovens bake differently keep an eye on the cake during the last 10 minutes of baking time, so that you can pull out as soon as a toothpick inserted in the middle comes out clean.
If you are going the 8×8 route and have leftover batter, at this time you would fill your muffins tins bake the cupcakes. If you are short on time however, refrigerate the rest of your batter to bake later. It will stay good for a couple days as long as it is tightly sealed.
Once the cake is baked, remove from oven and cool for approximately 30 minutes.
Cake Pop Time……
First step is to take a fork, or if you prefer a more “hands on” approach, then use your hands to break up the cake into little pieces. Some people like to put it into a food processor to get really fine cake crumbs, but this seems to work just fine for me.
When you are done crumbling the cake, add your frosting. I usually use about a half container of frosting for the 8×8 version (use a full container for the 9×13 version). I typically like a homemade frosting over store bought, but since we are using a cream cheese frosting in this mix, I feel better about a store bought. The store bought cream cheese frosting doesn’t need to be refrigerated versus the homemade version which should be. Either is fine, you will just need to refrigerate the cake pops if you make your own.
Once you have mixed the two together, you should have a mixture that holds together and looks similar to this…
Next take a 1 1/2 inch scoop and start making your balls. Lay them on a parchment paper lined baking sheet and refrigerate for 10-15 minutes.
While those are in the refrigerator, start melting your candy melts and get your sticks ready. I like to use a styrofoam block to stick my pops in while they are drying. You don’t have to have this, but it sure makes life much easier and prevents any flat spots on the cake pop while drying.
If your microwave has a “melt” button, use this option to melt your chocolate. Melt your candy melts in 15 second increments. You DO NOT want to over heat your chocolate!!! I cannot stress this enough!!! If you do, it will turn hard and chunky and once that happens, you will need to throw it and start over. I have learned this the hard way too many times.
Once your chocolate is melted, take your lollipop stick and dip about a 1/4 inch of the stick into the chocolate. This will act as glue once you insert it into your cake pop.
Immediately dip the stick into the cake pop. Insert the stick about half way into the cake pop.
Once you have put a stick in all of them, return to the refrigerator for another 15 minutes. I like to use a dish that has higher sides at this point. It will help keep them all standing up.
For the next step, you will want to work in small batches as you want to keep the balls chilled as you dip them. You will also want to make sure that you have a cellophane wrapped styrofoam block ready. Take your cake pop and dip into the chocolate. I have found that it works best to submerge straight down and remove. DO NOT swirl it around in the chocolate or the cake pop will break off of the stick. Bring the cake pop up and tap gently on the side of your dish to remove excess chocolate.
If there are spots on the bottom by the stick that didn’t get covered, before you tap the excess off, you can swirl the pop around until the chocolate covers all the cake. Once it is all covered, then proceed to tap to get excess off.
Now is when you would add sprinkles if you wish. Then, place into your styrofoam block to dry.
Once they are dry, you can store in an airtight container in the refrigerator. I have done these as much as a week in advance and they still taste wonderful. Just make sure they are in an airtight container in the refrigerator, otherwise they will absorb others scents and flavors in the refrigerator.
Beautiful!
I do see one problem though, the sprinkles I chose, even though there are shamrocks in them, look more like the colors of a certain football team that I have heard of??? This would be perfect if you were doing a themed party for that football team…is it the Packers I believe? Being that I am from Minnesota and am a die hard Vikings fan however, I will choose ignore the yellow and focus on the shamrocks.
I will just have to make sure the yellow sprinkles are removed when I do my
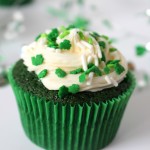
Green Velvet Cupcakes with the leftover batter from this recipe 🙂
Delicious and festive!
Green Velvet Cake:
2 1/2 cups all purpose flour
2 cups sugar
1 Tablespoon cocoa
1 teaspoon salt
1 teaspoon baking soda
2 eggs (slightly beaten)
1 cup vegetable or canola oil
1 cup buttermilk
1 Tablespoon vinegar
1 teaspoon vanilla
1 oz. green food coloring
Preheat your oven to 350 degrees.
Mix slightly beaten eggs, oil, buttermilk, vinegar, vanilla, and food coloring together and set aside. Next, whisk flour, sugar, cocoa, salt, and baking soda together. Pour your wet mixture into your dry ingredients.
Beat on med-high for 1-2 minutes or until combined.
Pour batter into a greased 9×13 cake pan.
***See variation below for cake pops baking instructions.
Bake 30-35 minutes, remove from oven and cool completely before frosting with a cream cheese frosting.
***For a large batch (approximately 50) of Green Velvet Cake Pops, bake as directed above. For a half batch (approximately 25) of Green Velvet Cake Pops, Fill an 8×8 greased pan about 2/3 full of batter. Bake 20-25 minutes, remove from oven and cool 30 minutes before adding frosting.
Refrigerate the remaining batter to use later for Green Velvet Cupcakes.
Extra Tip: Wrap Cake Pops in cellophane baggies and tie with curly ribbon to give as gifts.
Or arrange Cake Pops in a small weighted pot for a fun centerpiece.
Looking for other green or St. Patrick’s Day desserts? Check out all of my recipes here.






Leave a Reply