

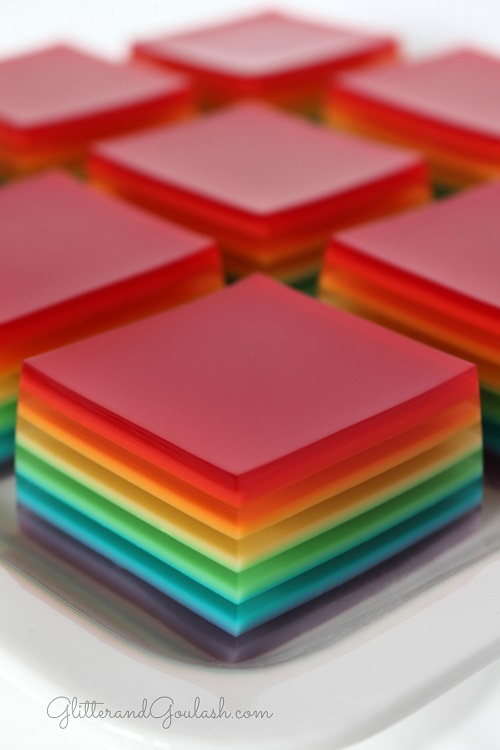
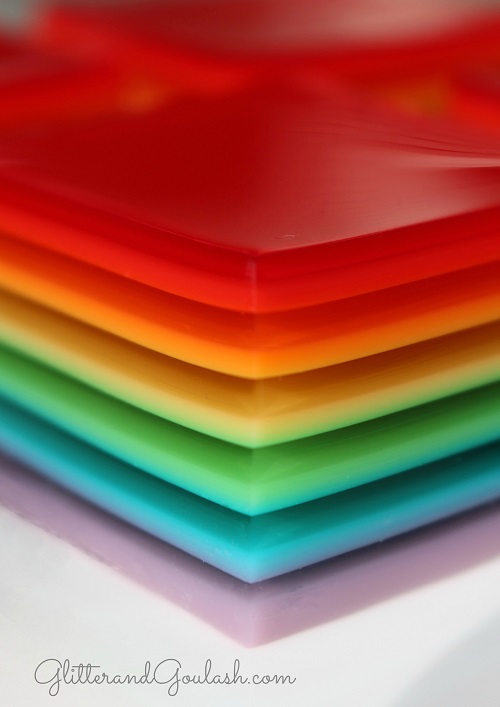
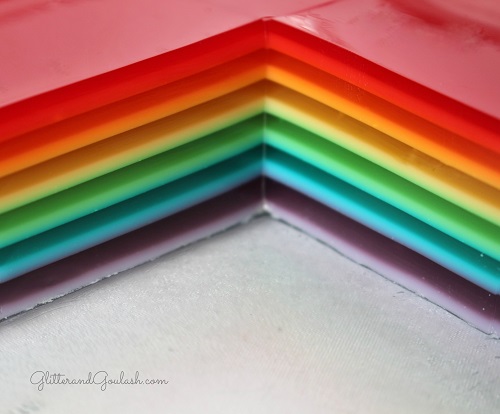
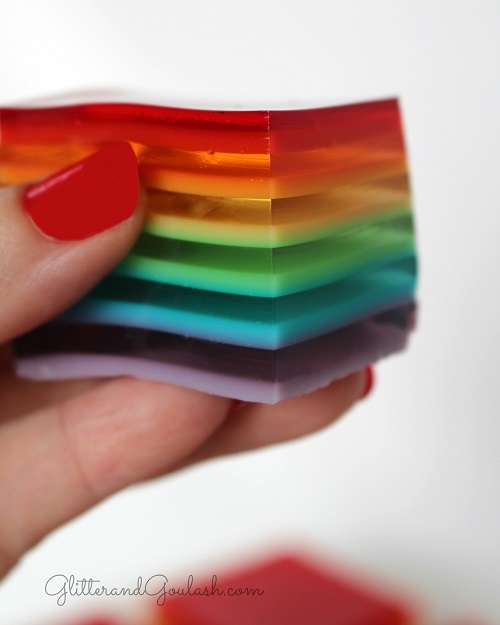
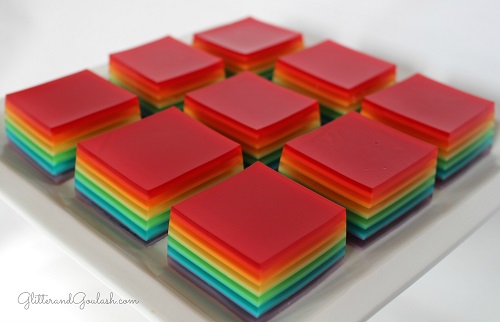
These Rainbow Jello Jigglers are a fun treat to have for any party or holiday. Since jigglers are meant to be finger food, they are also a perfect addition to your kids cold lunch. Their beautiful colors and fruity flavors are sure to be a hit wherever you decide to serve them.
I recently had a reader ask me if my Rainbow Jello Mold could be made as a more “kid friendly” version that they could eat with their hands. That is what led to the creation of this recipe.
I simply tweaked the original mold recipe to fit a 9×13 pan. This jiggler version is acutally very nice because you get all the beauty of the jello without the anxiety of having to take it out of the mold.
Don’t get me wrong the original mold recipe is absolutely beautiful and deserves priority for more elegant parties, but for everyday life, this fits the bill just fine!
Rainbow Jello Jigglers are easy to make, but it does require an approximate 3 hour time commitment from start to finish. You will not be in the kitchen the entire time, but will need to add layers every 10-15 minutes or so. So, pick a day when you will be doing stuff at home anyways and I promise it will be well worth the time!
These jigglers need to set overnight so make sure you plan ahead. You can make these jigglers several days before you need them. Just make sure you keep the Jello covered in the pan and refrigerated, until several hours before you will be serving them.
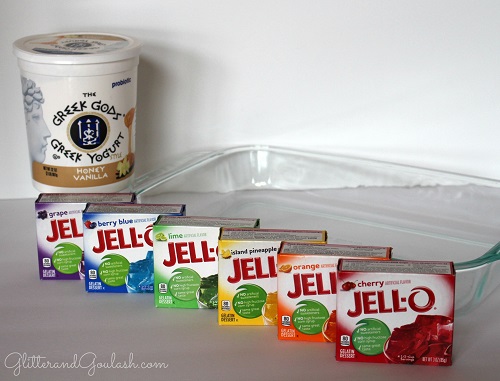
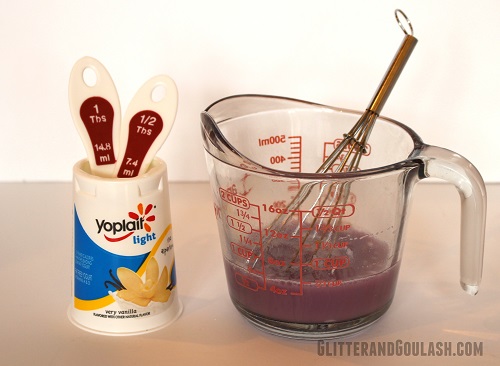
The items you will need for this mold are 6 packages of Jello (red, orange, yellow, green, blue, and purple) and any vanilla yogurt.
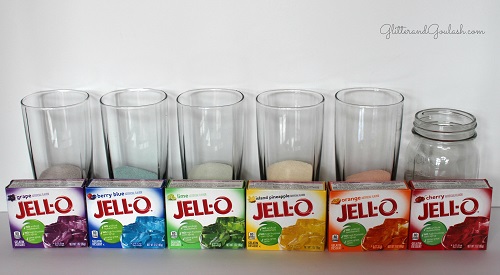
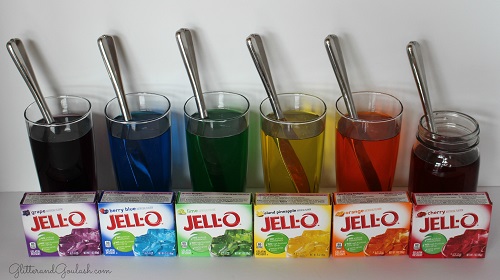
Next, stir 1 1/4 cups boiling water into each flavor. Stir each until gelatin is completely dissolved. You will want to position your glasses in opposite order of the rainbow as we will start with purple and end on red.
Spray your 9×13 glass dish with cooking spray, this will help the Jello release easier once it is set. Once you have done that we can start adding the Jello.
You will basically be adding 12 layers to this mold, 6 layers of pure Jello and 6 layers of the Jello/yogurt mixture. You will start each color with the Jello/yogurt mixture and end with the pure color layer.
Take 3/4 cup of your purple jello and set aside. Take the remaining purple jello and add 1 1/2 Tablespoons of the yogurt and whisk until completely dissolved. Make sure there are no yogurt lumps left.
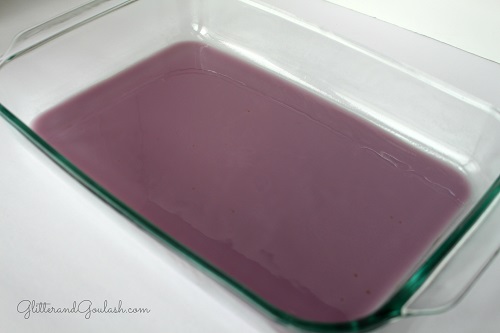
Once the yogurt is completely dissolved, add to your 9×13 glass dish and then place in the refrigerator for approximately 15 minutes.
Make sure you set a timer for each layer as knowing when to add the next layer is very critical. You must chill each layer long enough to partially set, but not too long otherwise the next layer will not adhere. Don’t worry though, I will explain below what to look for so that you know exactly when it is time to add the next layer.
While the purple Jello/yogurt layer is chilling, take the remaining purple gelatin (should be about 3/4 c) and place this mixture into the refrigerator as well to chill until your first 15 minutes is up.
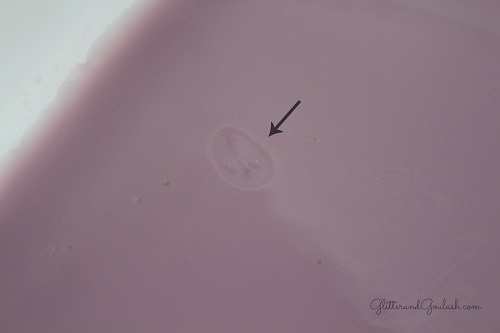
Once your timer goes off, take your pan and remaining Jello mixture out of the refrigerator. You will first want to test the gelatin in the pan to make sure it is set enough to take the next layer. First give it a VERY gentle jiggle. You should not see any liquid still moving around. Next, test the Jello by lightly touching it with a finger tip and lifting up right away.
The jello should tacky enough to stick to your finger and leave a slight impression in the jello. If you have that, then you are ready to add your next layer. If you don’t, then put the Jello back into the refrigertor for 3 minute intervals until it is formed enough to see your fingerprint.
This is hard to show in a picture, but if you look where the arrow is pointing, you will see the finger imprint that I am talking about. This is what you want to see to know that you are ready to add your next layer.
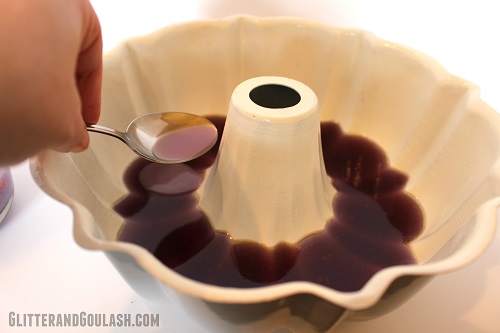
Once you see that, then you can VERY GENTLY spoon little by little the clear purple Jello to the first chilled layer. Add spoonfuls randomly all over the top of this layer (as oppossed to dumping all the liquid in the same spot). This will help not to put to much force in any one spot. When you add your spoonfuls of Jello you should see the liquid “roll” on top of the chilled layer. If it doesn’t do this and you see it start to mix (you will see both colors swirl), stop immediatley and put back into the refrigerator as that means the previous layer is not chilled enough.
I apologize, I forgot to take a picture of this step in the 9×13 pan, but this picture below (I copied from my Rainbow Jello Mold post) shows what I am talking about, it is just shown in a different pan. This Jello is sitting on top of the previous layer and not mixing, that is what you want.
This first layer is the trickiest so take extra time to go slowly with this layer. The others will be easier to work with since they will be cooled down more.
Once the second layer is added, place back into the refrigerator for 12-15 minutes. You will continue this same process for the rest of the 5 other colors (10 remaining layers). Your cooling time will start to lessen with each layer added as the Jello left on the counter cools down.
The other jello colors can remain on the counter during this entire process. I know that seems odd, I was very unsure of that the first time I made this. No worries though, it is fine sitting on the counter through this process. I have never had any of the waiting jello start to set. If this should happen though, simply fill a bowl with hot water and place your jello container inside of the water bowl and stir until the set jello loosens up and turns back into liquid (make sure not to get any water in your Jello).
Once you have added all 12 layers, let the Jello set overnight.
Once the Jello has set overnight, use cookie cutters to cut fun shapes, or simply cut into squares and enjoy!
Make sure you keep the Jello covered in the pan and refrigerated, until your are ready to serve it. The Jello is pretty firm once set, but keeping it in the pan until ready to serve just increases the chances of the layers all staying together.
Now take a step back, and pat yourself on the back for the beautiful creation you made. Job well done!!
Side Note- I do not recommend serving this at any outdoor gathering where it will be hot outside. I have learned the hard way that when Jello gets hot, it turns to liquid and melts which is not ideal for such a beautiful piece of food art! You will have a rainbowy mess on your hands and all over the table 🙁
Looking for St. Patrick’s Day desserts? Check out all of my recipes here?
- 8 cups boiling water
- 6 (3 oz.) packages of gelatin
- 1 purple
- 1 blue
- 1 green
- 1 yellow
- 1 orange
- 1 red
- 1½ cups any full fat vanilla yogurt (don't use low or reduced fat yogurt)
- First, dump your gelatin powder into 6 individual containers. The containers need to be able to hold at least 1¼ cups of hot liquid.
- Next, stir 1¼ cups boiling water into each flavor. Stir each until gelatin is completely dissolved. You will want to position your glasses in opposite order of the rainbow as we will start with purple and end on red.
- Spray your 9x13 glass pan with cooking spray, this will help the Jello release easily once it is set.
- Take ¾ cup of your purple jello and set aside. Take the remaining purple jello (about ¾ cup) and add 1½ Tablespoons of the yogurt and stir until completely dissolved. Make sure there are no yogurt lumps left. Once the yogurt is completely dissolved, add to your 9x13 glass dish and then place in the refrigerator for approximately 15 minutes.
- Make sure you set a timer for each layer as knowing when to add the next layer is very critical. You must chill each layer long enough to partially set, but not too long otherwise the next layer will not adhere.
- Once your timer goes off, take your pan and remaining Jello out of the refrigerator. You will first want to test the gelatin in the pan to make sure it is set enough to take the next layer. You will test this by lightly touching the jello with a finger tip and lifting up right away.
- The jello should stick to your finger (not liquid) and leave a slight impression in the jello. If you have that, then you are ready to add your next layer.
- Now you want to add your clear purple mixture. With a spoon very GENTLY and SLOWLY add your Jello to the set jello layer. Make sure your spoon is nice and low when you are adding the yogurt mixture. This will ensure you don't break through the bottom layer when you pour it in. Place back into the refrigerator for another 15 minutes.
- Complete this same process with the rest of your colors. Red will be your last layer.
- The other jello colors can remain on the counter during this entire process.
- I have never had any of the waiting jello start to set. If this should happen though, simply fill a bowl with hot water and place your jello container inside of the water bowl and stir until the set jello loosens up and turns back into liquid.
- Your cooling time will lessen with each layer added as the cooler the jello gets, the less time it takes to set.
- Once you have added all 12 layers, let the Jello set overnight.
- Keep refrigerated.


Can you tell me why you can’t use 0, low or reduced fat yogurt? I didn’t realize it had to be full fat.
I am not exactly sure of the chemistry behind why the recipe calls for full fat yogurt. I am guessing that the only reason is for a fuller flavor? I did some research on other gelatin layer molds for you and some of them actually call for low fat yogurt. So, I think you should be just fine to use a low fat version of yogurt. Please let me know how it turns out and I will change the recipe to include that variation.
Do you have to do the yogurt layer? I have some kids that are lactose intolerant. Thanks!
You do not have to do the yogurt layer, but the end result will look a little different. Another option, may be to use a lactose free yogurt as a substitute.
Thanks!!
Time consuming, inexpensive, eye-popping wonderful!!!! Perfect for all things summer.
I did change one thing. I used sour cream instead of yogurt.
I also stirred it with a whisk. The whisk made it easier to get the sour cream all the way mixed in, and the hello mixed faster.
Instead of pouring off half, I just spooned out half of the regular jello into the pan then while it chilled added the sour cream to the other half. Half the containers to wash later
Thank-you so much for sharing this on Pinterest!!!!
Great, so glad to hear that you liked it!
You say to add 1 1/4 cup of water but my packages say 2.5 cups. Am I supposed to follow what the box says?
Add 1 1/4 cup boiling water to each color (The red will get 2 1/2 cups since we are using two packets for that layer). The recipe you see on the box if for regulare Jello, we are making the jiggler version which requires less water to make it thicker.
I don’t see anywhere in the recipe that says 2 boxes of red. I’m confused
Thanks
Mary
Hi Mary, The print out recipe version and directions in the blog post both should reflect using two boxes of the red Jello. If you are seeing something different, please let me know so that I can correct it. Thank you!
How did you get it out of the pan that neatly??
Hi Shannon! Cutting these out of the 9×13 is sort of like cutting any pan of bars. You will have to sacrifice one (typically the corner piece) in order to get your spatula underneath. Once get one piece out of your way, you should be able to slide the spatula underneath and lift right. Make sure that you are using a very sharp knife.
If you are still having problems getting it out, try setting it in a very shallow amount of hot water for about 15 seconds. This will release the bottom layer from your pan. DON’T leave the jello in the hot water for more than 15 seconds though, otherwise it will start to melt your jello. Good luck!
Do you use instant jello?
Yes, regular Jello. I am not aware of different forms of it though. In order to better answer your question, can you tell me what other type are you referring to?
I’m so excited to make this for my daughter’s “rainbow art party” for tomorrow! I’m a little nervous about it, but I’m sure it will turn out well. Thanks for taking the time to go into such detail with your instructions!
Laura, I am so excited that you are going to try the rainbow jello mold. It seems much more intimidating than it really is. It is definitely a little tedious, but so worth it in the end. I would love to see a picture of the finished product. I hope your daughters birthday is wonderful!
http://www.glitterandgoulash.@gmail.com
Could you use Cool Whip instead of yogurt?
I have never personally tried using cool whip instead of yogurt and am not sure how it would turn out. Is it a dairy issue that you have with not wanting to use the yogurt? If so, there are dairy free substitutes that can be used?
Can you use sugar free jello? I can’t find all the colors in the regular version
I have never tried it before, but I don’t see any reason why it wouldn’t. I think you would be fine using it. Please let me know if it turns out so that I can let others know. Good luck!
I could never get the yogurt to fully dissolve. It stayed “speckled”. Any tips?
Maybe try to keep the yogurt at room temperature? I know mine never fully dissolves either, but once it sets in the jello you have to really look for it to see it.
If im making it with the larger packs of the jello so i can make more what should my measurments be?
Hi Amanda! I have never made it with the bigger boxes, so I cannot be sure of the measurements. Using the recipe “as is” will bring the amount of liquid right to the top of the bundt pan, so if you are going to use the bigger boxes, you will need to find something twice as big to make the jello in. If you need more than what this recipe makes, I would suggest to just do two different bundt pans.
My guess for measurments would be to double everything. Since the bigger boxes are exactly double the smaller boxes (6oz. vs 3oz.), I think this would turn out fine.
Please let me know how it turns out, good luck!
Is it possible to use whipped cream in the place of the yogurt? Or should I just put all the same colour jello as a layer and add whipped cream before doing the next?
I have never used whipped cream, so I am not sure how it would turn out. This is one recipe that I do not recommend using substitutions for. With any other recipe, I would typically say “try it” and see what happens. Since this recipe takes a three hour committment though, I don’t think I would risk it.